
- Step 1: How to write a blog—choose your topic
- Step 2: Know what SEO is? If not, that may be why your blogs don’t get many views
- Step 3 of how to write a blog—first impressions count
- Step 4: Remember your school writing classes? Turns out outlines are actually useful
- Step 5: The first draft—often the hardest part of how to write a blog
- Step 6: Phew! I’m done with my first draft. That’s it, right?
- Step 7: Did Hemingway know how to write a blog? I don’t know—but he helps me with all of mine
- Step 8: Grammarly, accept all changes—don’t do it!
- Step 9: My least favorite step of how to write a blog has nothing to do with writing
- Step 10 of how to write a blog—add your blog to your website
- Step 11: Boost convenience (and SEO) with a table of contents
- Step 12 of how to write a blog—the occasional plugin isn’t a bad idea
- Step 13: I used Grammarly—I don’t need to proofread, right?
- Step 14: Check the links—all of them. Every. Last. One.
- Step 15 of how to write a blog post—schedule that sucker
I had a lot more time when I started as an English copywriter. I began writing a blog a week and kept that up for a year. But as I picked up more work, that pace became unsustainable. I cut back to one blog a month, which I’ve maintained for the past two years. While the frequency has changed, my method has stayed consistent. Want to know how to write a blog? Let me share the method that works for me.
Step 1: How to write a blog—choose your topic
The obvious first step is to choose your topic. This may seem easy, but it can be more challenging than you’d expect. I keep a list of topics that I review when it’s time to write my next blog. Sometimes, something timely or an article I’ve recently read prompts a topic. If not, I check my list and see what I’m feeling.

Once I’ve settled on my topic, I sit on it for a few days. I mull it over from time to time and jot down notes/ideas here and there. If it’s a topic that requires research, I’ll spend an evening or two doing that research. After a few days, I usually have a pretty good idea of how I will approach the topic.
Step 2: Know what SEO is? If not, that may be why your blogs don’t get many views
SEO stands for “search engine optimization.” This means creating content that appears at the top of search engine results, like Google. If you search for “All 12 English verb tenses with examples”, my top-performing post is in the top 20 results. The goal is to appear in the top 10, which is page one (try searching for “can anyone become a copywriter”). Depending on your topic, you may have a lot of competition. But with SEO, the higher you rank, the more likely people will find your content through searches.
To rank higher, you need to choose the keyword(s) you want to rank for. With my second example above, “copywriter” is a very broad term and would be very challenging to rank well for. But people tend to ask questions or search for phrases when looking for info on the Internet. That’s why I optimized my blog for the term “Can anyone become a copywriter”. “How to become a copywriter” and “how can I become a copywriter” are more popular and thus much harder to rank for.
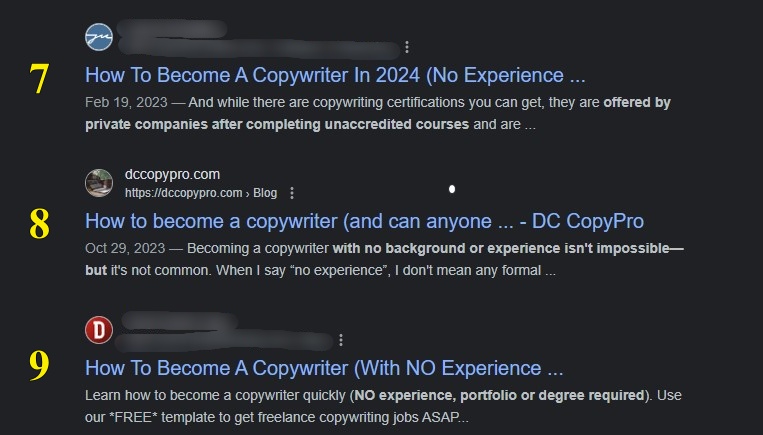
SEO and keywords are part of a massive rabbit hole you can go down. I know a little about a little. Not all my blogs rank well, but I’ve got a few that do all right, partly due to using what I know about SEO. But having a good keyword phrase is an excellent first step. Once you’ve settled on that, you’ve got to use it in the right way.
As you read this blog, see if you can figure out which keyword phrase I chose.
Step 3 of how to write a blog—first impressions count
The first thing people see is your title—aka your headline. It’s like a newspaper headline. Its job is to entice you into clicking it. Not easy when people are increasingly bombarded by more and more online content.
Including your keyword phrase in your headline helps your search engine ranking. Include it in your blog URL too. There are lots of “tricks” that can make your headline more enticing, including:
- Asking a question
- Including numbers
- Triggering an emotion
- Alluding to “secret” information
- Explaining how to do something
- Making a shocking claim
There’s no best way. Each blog will need a different approach. What method(s) did I use in my headline here? Why did you click on it? What resonated with you?
There are tools to help you analyze your headline. I’ve been using Coschedule Headline Analyzer. Until recently, it had a completely free version. But now the free version limits you to 10 rewrites per month (it was 25/headline). I liked this tool, but I’m looking for an alternative. Paying $50 to help with 13 blogs a year doesn’t make financial sense. If I write more freelance blogs, I’ll reconsider. But if you’ve got an alternative, let me know.

Like many of the tips in this blog, this is a tool. A higher-scoring headline won’t guarantee better search engine results. Tools like this can be great for figuring out what your headline may be missing and how to improve it. I aim for over 70, but if I can get in the 80s, that’s great. I’ve only ever managed one headline over 90 (and I don’t remember which one). Some advocate for spending 50% of your time on your headline, but don’t get obsessed with super high numbers. Use these tools as a guide, not as a definitive statement.
Step 4: Remember your school writing classes? Turns out outlines are actually useful
I always make an outline. It helps me organize my thoughts. It’s also useful for determining the headings I’ll use in my blog. Remember how I talked about SEO earlier? Including your keyword phrase in your headings (in addition to your title) is good for SEO. Figured out my keyword phrase yet? How many times have I used it in my headings? 😉
You don’t need to create a complex outline, but you can. Even a brief outline is better than nothing. And nothing is set in stone. You can always change it later, but creating an outline gives you a plan and some basic structure. It also helps ensure you don’t forget a critical piece of information.
Step 5: The first draft—often the hardest part of how to write a blog
Ever heard how intimidating a blank page (or a flashing cursor) is? Like so many things, getting started is often the most challenging part. That’s one of the great things about an outline. You have a plan for what you’re going to write. Don’t know how to start the introduction? Fine! Start writing your first point. Come back to the introduction later.

With writing, just getting something down on paper (or on the screen) is a massive step forward. Once you have something in front of you, you can assess it. It may be pure gold. It might be garbage. But you have something you can work with. Or, at worst, you’ll realize your approach isn’t working, and you can try something different.
Your first draft will likely be ugly—and that’s okay. Don’t worry about grammar, spelling, or structure too much. Do your best to follow your outline and get your ideas down. Once you can see them, they’ll be a lot easier to edit.
Step 6: Phew! I’m done with my first draft. That’s it, right?
Nope! Your first draft is exactly that—a draft. I usually write my first draft in one or two sittings. A day or two later, I sit down and revise it. I read it over, clean it up, move stuff around, add stuff I forgot, and get rid of the crap (what was I thinking?!?).
I usually don’t have time for several rewrites, but I always do at least one. When I have time, I do more. There are a few more steps in my process where I continue to refine what I’ve written. But by writing more drafts, you’ll refine your ideas and arguments.
Step 7: Did Hemingway know how to write a blog? I don’t know—but he helps me with all of mine
I’ve written about how I run all my blogs through the Hemingway app (affiliate link). Like the headline analyzer I mentioned above, this is a tool. I don’t accept every suggestion, but trying to hit Hemingway’s targets is a great place to start.
Writing at a lower grade level makes it easier for people to consume your content. Most of my content targets EFL/ESL speakers, so I must keep my writing simple. The cutoff for me is grade 8, but I shoot for lower. This blog was at a Grade 3 level after editing.

I always try to keep the number of adverbs and uses of the passive voice under the suggested targets. I review the “simpler alternative” suggestions but don’t always use them. Sometimes, I prefer the phrase I’ve used. Occasionally, I make the change. But ultimately, I decide which changes to make.
I try to remove all “very hard to read” sentences and minimize the “hard to read” ones. This makes my writing as easy to digest as possible for non-native English speakers. It’s not a bad strategy for most blog writing.
The more I use the Hemingway app, the more I make these edits naturally. When I analyzed this blog in Hemingway, I only had 4 “very hard to read” sentences. That’s because I’m better at writing shorter, easier-to-understand sentences. I still use too many adverbs (my second draft had 30, with a goal of 24 or fewer). With Hemingway, I got that down to 16.
My “After Hemingway” image shows my word count increased by more than 500. Hemingway gives me another chance to revise my writing—like a third draft. Going through it paragraph by paragraph is another chance to improve my writing. That’s in addition to Hemingway’s suggested edits.
Step 8: Grammarly, accept all changes—don’t do it!
After I’ve run my blog through the Hemingway app, I run it through Grammarly (affiliate link). But again, it’s a tool. When you see “97 Alerts left”, you may be tempted to hit the “Accept all XX” changes—but don’t. I review every suggestion. I accept many suggestions, but not all. Sometimes, the suggested changes make things sound more unnatural. Other times, they’re not quite right. And there are several cases where they’re plain wrong. Grammarly is good, but it’s not infallible.

It’s great for catching spelling and basic grammar mistakes. I find it helpful for finding synonyms to replace overused words. It’s also great for rewriting phrases that are wordy or could be clearer. But check these suggestions the closest. The suggested rewrites can often completely change the meaning of your sentence.
Step 9: My least favorite step of how to write a blog has nothing to do with writing
Most guides on how to write a blog will suggest you use pictures. They help to break up the wall of text. But I often struggle to find images that fit with my writing. This is more challenging because I confine myself to free stock photo sites. My go-tos are:
If you use these sites, and the image you select requires that you give credit—do it.
Suggestions for how often to include images varies. My general rule of thumb is one picture for every 300 or so words. I have a word count by this point in my blog writing process. I divide by 300, which roughly tells me how many images I need. This blog is about 3,500 words, so it should have 11-12 pics (did I follow my own advice?). I then look for places to insert images that are well-spaced out. And, of course, they somehow need to relate to the surrounding content.
This is the task that takes me longer than I’d like. I waste so much time trying to think of a word or phrase to search for that relates to the content I’ve written. Again, I’m limited by using free sites. Often, I see the “perfect” image from “Istock” or other paid sites—but I’m not in a position to pay for those yet. Maybe one day.

If you spend enough time searching stock photos, something interesting will happen. You’ll start recognizing free stock images on other people’s blogs—trust me! 😉
Step 10 of how to write a blog—add your blog to your website
Until this point in the process, I do everything in Google Docs. I find it much easier to work in Google Docs rather than editing in WordPress.
Doing a few things in Google Docs makes it super easy to copy and paste your blog into WordPress.
- Use headings—they’ll transfer perfectly. Use H1 for your title and H2 and H3 for your other sections
- Leave a blank line above and below images— they’ll be imported as proper images in WordPress
- Bulleted/numbered lists also import well
- Bold, italic, and underlined text will also carry over
- Linked text will also work
If you need further formatting, you’ll have to do that in WordPress. Another pro tip—don’t forget to use the mobile view if you use any advanced formatting or layouts. Things like tables can look quite different when viewed on a desktop compared to a mobile device. And with more and more people using their phones to read blogs, you can’t forget that.
If you’ve used my tip to add images to your blog post, don’t forget to add “alt text” to all of them. This is the text that appears if your images are unable to load. Alt text is also used by screen readers for visually impaired people. Though you shouldn’t abuse this “hack,” you can often find an image or two to include your keyword phrase in your alt text. But again, don’t go overboard here and remember the primary purpose of alt text.

Step 11: Boost convenience (and SEO) with a table of contents
Finally, you’ll notice that all my blog posts start with a clickable table of contents. When I first started blogging, someone told me that Google likes this when it indexes pages. It also provides a level of convenience for your readers. What if someone interested in the present perfect tense found my verb tenses blog? My table of contents makes it easier for them to quickly get the info they want. Your table of contents will be based on your headings. Did you follow my advice to include your keyword phrase in your headings? If so, you’ll repeat your keyword phrase near the beginning of your blog. And that’s never a bad thing for Google.
To make your table of contents clickable, first create an anchor link. Navigate to your first headline and find “HTML Anchor” under the “Advanced” block options on the right. I like to copy and paste the headline here. It will automatically replace spaces with hyphens. Then copy that link, highlight the bullet point from your table of contents, add a #, and then paste your link. The # indicates the link is on the page, not elsewhere on the Internet.
Step 12 of how to write a blog—the occasional plugin isn’t a bad idea
Depending on your WordPress plan, you may or may not be able to add plugins. You’ll need to be on a paid plan to add plugins in WordPress. Initially, I used the cheapest tier, but after a year or two, I upgraded, and one of the first plugins I added was Yoast SEO. There are many SEO plugins, but Yoast is one of the most popular. The free version is enough for my needs.

Again, Yoast SEO is a tool. But I use it to optimize my blog for SEO. I make enough suggested edits/adjustments that the little SEO light turns green. The “readability” tab is also quite helpful. The Hemingway app helps with this. But the readability tab checks for a few other things that I find useful.
It lets you know when some of your sections are too long (i.e. you should add some more headings). It also warns you if you’ve got three or more consecutive repetitive sentences. Remember those extra words I added in my Hemingway edit? I trimmed almost 300 of them based on suggestions on the readability tab. The readability also gives you another check for excessive use of the passive.
Remember, this, too, is but a tool. I don’t always make all the suggested changes. But I find ways to complete the necessary changes to turn both the readability and SEO lights green.
Step 13: I used Grammarly—I don’t need to proofread, right?
The hell you don’t! During all these SEO and readability edits, typos and other errors sneak in. One of my favorite proofreading tips is to do a search for double spaces. They sneak in all the time. Try it on your next blog—I bet you catch a few. I caught three in this blog. 😉

Another of my favorite proofreading tips is using a screen reader to read my blog back to me. Spending so much time with your blog, you become so familiar with it that you gloss over mistakes. Hearing your blog is a great way to interact with your copy differently. You’ll hear mistakes jump out at you that you missed while reading your copy hundreds of times. I currently use the Read Aloud extension for Chrome. It’s a bit buggy (if you stop and start too many times, it freezes), but it does the job.
Step 14: Check the links—all of them. Every. Last. One.
Adding links involves a lot of copying and pasting. FYI, one of my favorite keyboard shortcuts is “ctrl + k” for inserting links—a great timesaver. But with all that copying and pasting, errors are bound to occur.
I prefer all my links (other than those in my table of contents or that link to my own site) to open in a new tab so my reader doesn’t lose my content. I check every link to external sources to ensure it opens in a new tab with the intended link. It’s also a good idea to check the links in your table of contents. A few seconds spent checking those links never hurts.
Step 15 of how to write a blog post—schedule that sucker
Once you’ve checked, refined, proofread, and double-checked your blog, it’s time to release it into the wild. Take a deep breath and post that bad boy! I prefer to schedule my blogs at the same time each week, but there’s no reason you can’t hit publish if you like. I set a deadline to schedule my blog at least a day or two before I want to post it. This ensures I’m not scrambling at the last minute to get a blog live. But that’s me—you do you.

I still remember the first time I scheduled a blog. I felt it was as good as it could be, and I didn’t know what else to do to improve it. But I wasn’t convinced it was good enough. That’s the thing with writing—it’ll likely never be perfect. You can edit and refine your blog until the end of time. But at some point, you’ve got to bite the bullet and release it into the ether. Like so many other things, it gets a little easier each time you do it.
And there you have it—15 steps on how to write a blog. Or at least how I write a blog. I’d love to hear your blog writing tips and tricks in the comments—this old dog is never too old to learn some new tricks!
Subscribe to this blog or follow me on Instagram, Threads, Facebook, LinkedIn, or Twitter for more content and updates.