
- Google Docs is my go-to editor for writing blogs—the first of my recommended free tools every blogger needs
- Quickly structure documents and blog posts with headings
- A few bonus tips about pictures in blog posts
- I knew squat about grammar before teaching English—now I understand Grammarly’s suggestions
- Forget everything you learned about writing long, complicated sentences to sound authoritative
- I’m trying not to be “passive” aggressive, but try to minimize its use
- If you want people to read your post, they’ve gotta click on it first
- Just because it’s free doesn’t mean it isn’t one of the free tools every blogger needs
- Why can’t I think of that word? It’s so…oh…what is it? Argh!
- My vast nine months of knowledge shared with you in just over 2,500 words
Last week, I shared links to some friends’ social media and blogs. This week, I’m going to write about five free tools every blogger needs. These tools will make blogging easier and help you produce more consumable content. With a bit of work, you’ll be pumping out more clickable content in no time!
The most basic tool you need is a text editor for writing your blogs. Of course, you have several options:
- Microsoft Word
- Office 365
- Pages
- Google Docs
Google Docs gets my vote. You rarely need the power of more powerful text editors for a simple blog post, and Google Docs works great. It’s my first recommendation of the free tools every blogger needs.
Google Docs is my go-to editor for writing blogs—the first of my recommended free tools every blogger needs
First, Google Docs saves your work to the cloud. Your files are available anywhere with any Internet connection—no thumb drives. Second, Google Docs auto-saves every few minutes, resulting in less lost work. You also have version histories if you need to revisit a previous idea that you’d scrapped.
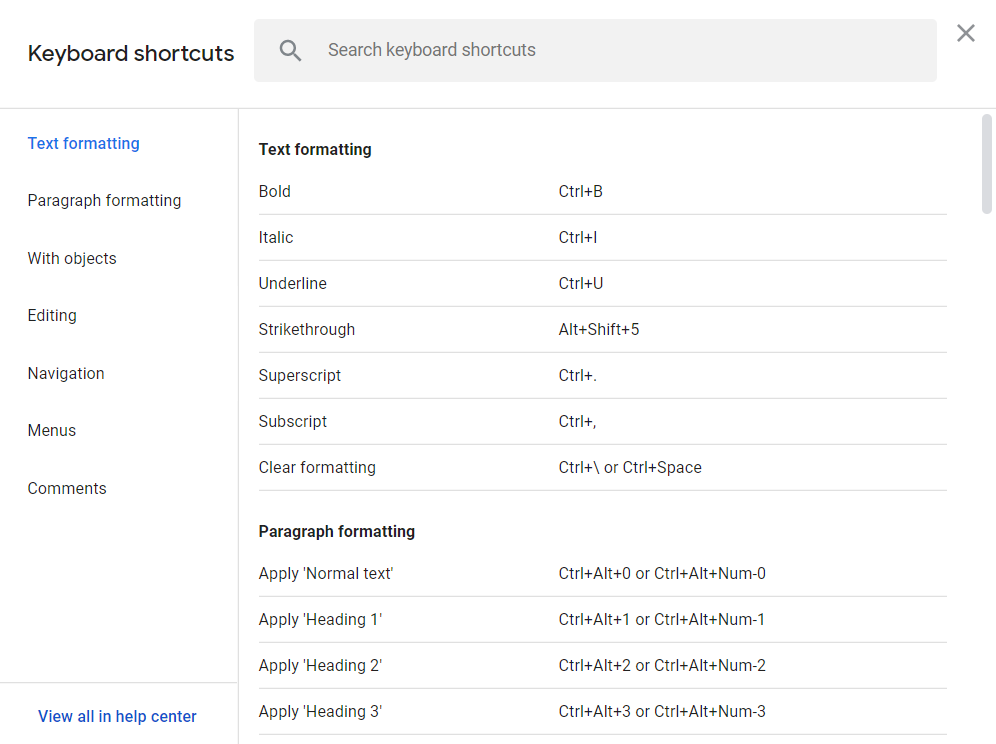
Finally, Google Docs has several helpful keyboard shortcuts that are easy to memorize. Once you start using them, they’ll save you so much time. A few of my favorites are:
Basic Shortcuts:
- CTRL + C → copy
- CTRL + V → paste
- CTRL + SHIFT + V → paste without formatting (match current formatting)
- CTRL + F → brings up the search bar
- CTRL + H → brings up search and replace
- CTRL + Z → undo
- CTRL + SHIFT + Z or (CTRL + Y) → redo
- CTRL + A → select all text
Intermediate Level Shortcuts:
- CTRL + SHIFT + C → displays total words & characters (entire doc/selected text)
- CTRL + K → insert a link to the highlighted text
- CTRL + SHIFT + 7 → create a numbered list
- CTRL + SHIFT + 8 → create a bulleted list
- CTRL + SHIFT + ALT + Z → switch to editing mode
- CTRL + SHIFT + ALT + X → switch to suggesting mode
The last two are great for collaborating on a blog. Your co-author can see your changes/suggestions, accept or reject them, and go back to editing. Yeah, I’m looking at you two guys. 😏
Quickly structure documents and blog posts with headings
But my favorite shortcuts are for headings! These headings carry over into WordPress, but I’m not sure about other platforms. BTW, I’ve found composing in WordPress to be tedious and cumbersome. I’d say 98% of what I do in Google Docs copies into WordPress without issue.
- CTRL + ALT + 1 → Heading 1 (only use this for the title of your post)
- CTRL + ALT + 2 → Heading 2
- CTRL + ALT + 3 → Heading 3 (you’ll rarely need more than this)
- CTRL + ALT + 0 → Normal Text
This saves me so much time, and as a bonus, I have a handy little document tree in the left-hand pane. Navigation made easy! It’s so much easier than setting up headings in WordPress!
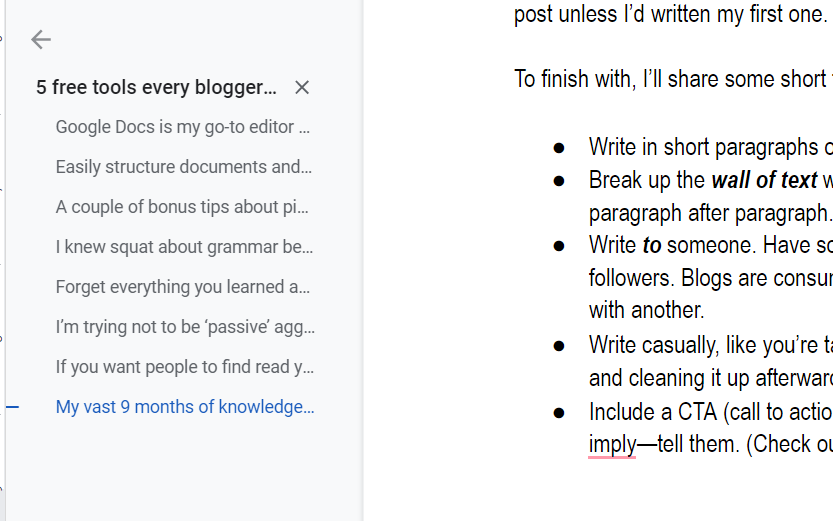
As a bonus, you have a built-in spellchecker (CTRL + ALT + X). It’s not the best out there, but it’s a start. Any red or blue squiggly lines are worthy of investigation! I suggest running spellcheck yourself since not all errors get highlighted while typing.
A few bonus tips about pictures in blog posts
Pro Tip 1: You can paste pics into your post in Google Docs. When you copy and paste the whole document into WordPress, the pics get added, too. But…make sure to leave a blank line between any pics and text. If you do that, WordPress will add them as images. Without the extra line, they often get imported as part of the paragraph. When that happens, they won’t display correctly, and you can’t add alt text.
Pro Tip 2: Use pictures—a lot of pictures. Somewhere in the vicinity of one pic for every 300 words. If you use images other than your own, be sure to have explicit permission to use those pictures. Your other option is to use free (or paid) stock photos. Some stock photo sites require attributions and some don’t. If a site requires picture attributions, include them.
Pro Tip 3: (My favorite free stock images sites)
I knew squat about grammar before teaching English—now I understand Grammarly’s suggestions
Yes, you should be using Grammarly (affiliate link). It’s my second recommendation for free tools every blogger needs. I don’t care how well you write. It will cut down on your typos, and it usually knows grammar rules you don’t. Even the free version is quite powerful. This is another reason I use Google Docs—Grammarly has a Chrome extension. You can edit in Grammarly’s editor, but I’ve had no issues using the Grammarly extension in Google Docs.
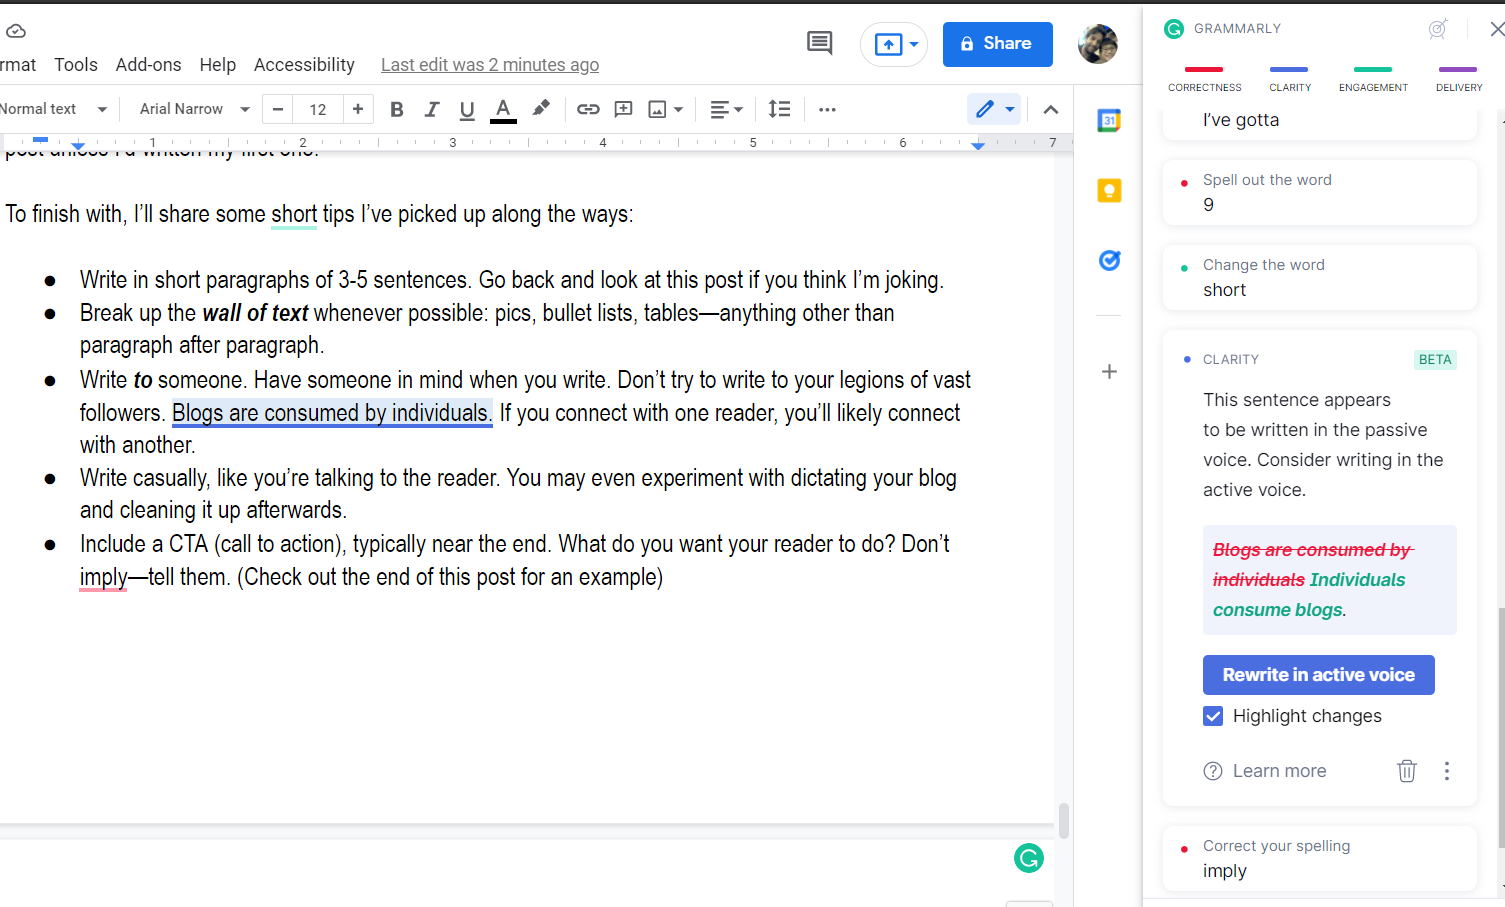
My only complaint is the lack of keyboard shortcuts while checking docs. And yes, I’ve contacted Grammarly. Not a deal-breaker, but I would appreciate it. Like Google Docs, it suggests corrections as you type. Sold red lines indicate spelling issues, while solid blue lines mean a grammar problem. This is similar to Google’s squiggly lines.
One of the most helpful grammar suggestions Grammarly makes is passive voice detection. Without going down a grammar rabbit hole, it is generally preferred to write in the active voice. It’s more direct and stronger.
- The woman drove the car. (Active voice)
- The car was driven by the woman. (Passive voice)

The passive is not “wrong,” but writing in the active voice is typically preferred in blogs. It’s not always possible to rewrite sentences in the active, but it’s a good idea to cut down on your use of the passive.
Finally, even if you use Grammarly, you should still use Google Doc’s spellcheck. I’ve found the two tools catch things the other doesn’t. A couple of clicks for some added peace of mind—what have you got to lose?
Forget everything you learned about writing long, complicated sentences to sound authoritative
The Hemingway App (affiliate link) is another excellent tool for writers. I found it while learning about copywriting. I use it with all my blog posts and many of my work projects. There is a desktop app, but the webpage works for me. It’s my third choice for free tools every blogger needs.
When I finish writing a blog post, I run it through Google spellcheck and Grammarly. Then I copy and paste the whole thing into the Hemingway App. If you have pics in your blog post, it’ll ignore them, but it’ll preserve text formatting.
Once you paste your writing into the Hemingway App, you’ll immediately see some stats on the right.
 |  |
In general, shoot for a lower readability score. Hemingway will suggest lowering the score if you’re over Grade 9 or 10.
After that, you’ll see the handy word count—click on “Show More” to see more info. You can do the same info using CTRL + SHIFT + C in Google Docs. Next, you’ll see adverbs. I’d be shocked if you pasted your blog into Hemingway and it said you’d met the goal for adverbs. We tend to overuse adverbs in our writing (I’m incredibly guilty of this 😏). I’m getting better, but I can usually get rid of several superfluous adverbs using Hemingway.
Though not always possible, you should use descriptive verbs instead of adverbs. Don’t say the man ran quickly. Say the man bolted. Don’t say the woman walked carefully. Say she crept. You won’t be able to omit all the adverbs from your writing. And you shouldn’t. But like the passive voice, try not to use them too often.
I’m trying not to be “passive” aggressive, but try to minimize its use
Speaking of the passive voice, what’s next on the list? Yup…instances of the passive voice. Grammarly will sometimes offer suggestions for correcting the passive voice. But Hemingway will only alert you to the presence of the passive voice. It’s up to you to rephrase your writing to get rid of the passive voice where possible—and when desired.
In school, were you forced to learn lists of vocabulary words? And were you encouraged to use those words as often as possible? But that isn’t always such a great thing. Utilizing complex verbiage to create the illusion of superior intellect results in an appearance of pomposity. I mean—using big words to seem smart makes you look like an ass. 😉
The next two stats will be most helpful. If you’ve been reading my blogs for a while, have you ever felt I write in short, choppy sentences? Hopefully not. I’ll wager that you didn’t notice, but I tend to write in shorter sentences.

This doesn’t always happen in my first draft. But I use Hemingway to reduce the number of “hard to read” and “very hard to read” sentences. After nine months of using Hemingway, I’m getting better at doing this on my own as I write. But Hemingway always reminds me I can do better.
With Hemingway, I tend to work on one section at a time and then copy and paste it back into my Google Doc. Then I delete that section (the editor has a weird habit of jumping back to the top of the doc). You’ll want to use CTRL + SHIFT + V to paste without formatting. If you don’t, your text will be in a different font with a gray background.
If you want people to read your post, they’ve gotta click on it first
The title of your blog and the headings within your post are sometimes referred to as headlines. Studying copywriting or content writing will teach you how important they are. I am by no means an expert, but as I look back over my blog titles, I can now see which ones were “winners” and which ones were not.
There are thousands of pages about how different headline types grab readers’ attention. I would encourage you to do your own research in that area. But for now, here’s my fourth recommendation for free tools every blogger needs. I use a tool called Headline Studio from Coschedule. You can use the website, but I prefer the free Chrome extension. You put your headline in, and it gives you a “score” related to how compelling your headline might be.
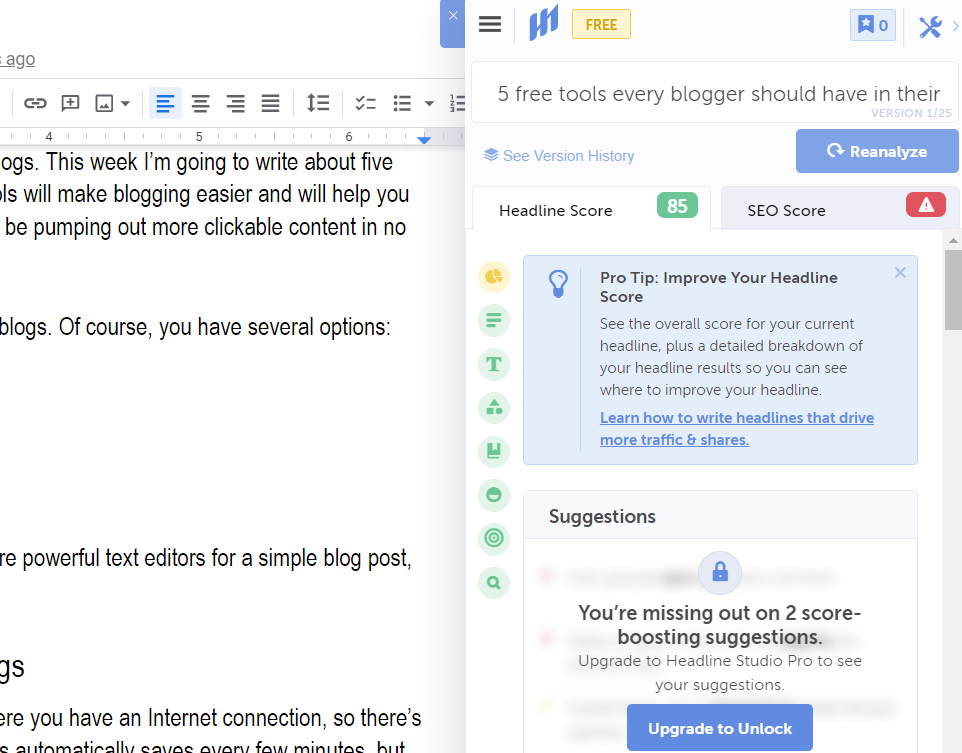
You’ll want to use the free version—trust me. Headline Studio has revised their pricing plans. You get 10 free “credits” per month. The first paid plan starts at $29/year for 10 credits/month on the premium plan. Each headline and rewrite costs you a credit. As a copywriter and content writer, I find this pretty restrictive.
On the previous free plan, you could tweak up to five headlines and get about 25 iterations per headline. That would now cost you 125 credits (79$/year for the Basic plan, or 99$/year for the premium version). Considering I used to be able to do that for free, I find the price excessive for personal use. I’ll just use my 10 credits/month carefully.
Though I’m not thrilled with the new credit system, I’ll continue using Headline Studio until I find a better alternative.
Just because it’s free doesn’t mean it isn’t one of the free tools every blogger needs
You don’t get access to all the goodies with the free version—but it’s still great. The higher the score, the better—usually. Like everything in this post, these are tools! Google Docs spellcheck gets suggestions wrong. So does Grammarly. They both miss things (like the typo a friend commented on in last week’s post). The Hemingway App may suggest omitting an adverb that may convey a nuance you deem necessary.
Headline Studio is another tool. Your headline with a score of 68 won’t necessarily perform worse than another one that scores 77. You’ll notice the circle turns green at 70. That’s the baseline I shoot for. I’ve written hundreds of headlines in the past nine months. I’ve yet to score in the 90s (keep reading 😉). There are times I’ve used headlines that scored in the high 60s. The choice is yours.
Look at the stats, especially the sections marked yellow or red. They’ll give you clues about what you’re doing wrong or what you’re missing. For example, this blog’s original title scored an 85. It got green for everything except the first stat—word balance. Headline Studio felt my headline had too many Common Words and no Power Words. BTW, Emotional and Power Words are hidden in the free version, but there’s always Google.
I played around and came up with the title that appears now—my first headline in the 90s! I prefer the original title. I’m worried the current title feels “clickbaity.” But it will be an interesting experiment. It’s my highest-scoring headline yet—I’ve gotta try it!
Last week, I mentioned a previous blog post about the 12 English verb tenses. It’s the post that gets the most hits from online searches. It scored a 68. Headline Studio’s a tool, not a magic bullet.

Why can’t I think of that word? It’s so…oh…what is it? Argh!
Every struggle to find that perfect word? I know I have. Maybe one of Grammarly’s suggestions isn’t quite right, but you still think a change is needed. That’s where a thesaurus can come in very handy. But not just any thesaurus. This one.
The OneLook Thesaurus touts itself as a reverse dictionary. You can use it like a regular thesaurus and enter a single word to get synonyms and antonyms. But you can also describe the word you’re trying to find, with a phrase or sentence. Clicking on the “help” button at the bottom of the page will show you all the ways you can use this excellent free tool.

Whichever method you use, you’ll get a list of words that you can further filter and sort. You can click on any of the words in the list to get more information. You can even try the Image Map beta feature, which might spark something for you.
There are so many ways to use this great free tool. That’s why I’m including it as the last entry on my list of five free tools every blogger needs.
My vast nine months of knowledge shared with you in just over 2,500 words
That’s what I’ve learned about blogging since I started my journey. Even in this short time, I cringe at some of my early blogs. But we don’t get better unless we do. I wouldn’t have been able to write this post unless I’d written my first one.
To finish, I’ll share some quick tips I’ve picked up along the ways:
- Write in short paragraphs of 3–6 sentences. Go back and look at this post if you think I’m joking.
- Break up the wall of text whenever possible: pics, bullet lists, and tables—anything other than paragraph after paragraph.
- Write to someone. Have someone in mind when you write. Don’t try to write to your legions of vast followers. Individuals consume blogs. If you connect with one reader, you’ll likely connect with another.
- Write casually, like you’re talking to the reader. You may even experiment with dictating your blog and cleaning it up afterwards.
- Include a CTA (call to action), typically near the end. What do you want your reader to do? Don’t hint at or imply something—tell them. (Check out the end of this post for an example)
That’s all I’ve got, for now. I’m still trying to use all the tips and tricks I’ve included here in my personal and professional writing. But like most things, the more you do it, the easier it gets. It’s a work in progress.
Did I miss any blogging tools you can’t live without? Got a stock image site I missed? I’d love to hear about them! Comment below or get in touch with me on social media!
Subscribe to this blog or follow me on Instagram, Threads, Facebook, LinkedIn, or Twitter for more content and updates.
Thank you for sharing your experience! We’ve been using Google Docs and then pasting into WordPress, trying to jam it into a format we figured out in WordPress. We definitely need more pictures too.
And CTRL-Shift-V is AMAZING. I hate that I can’t use it in Office, it’s only the most useful keyboard shortcut ever.
Happy to share what little I’ve learned in the past few months. Lots more to learn, but always glad to help others avoid a few headaches. And yes, CTRL+SHIFT+V rocks.
“I was missing” the Hemingway app only.
I’m using Grammarly for all corrections after I write and shape my blog posts directly in WP. I guess it’s all down to how used we are with the apps. I sparingly use Google Docs, not because of its functionality but because I thought Grammarly should suffice for my needs.
Thanks for sharing.
My pleasure! Glad you found something of use! And definitely try using the Google Docs spell check. It catches stuff Gramnarly doesn’t.